Several years ago I made stained glass windows for three of the transoms in our dining area. I planned on making two more to go over the doors. It has taken me 6 years, but I am finally getting around to it! This time I am documenting the process and thought others might find it interesting too.
The first step is to create the design. Since this isn't the first one in the set, I had the previous designs to get me started. The basic layout is the same as the other transoms so I don't need to worry about picking colors for the glass. I did need to adjust the dimensions to match the width of the doors (which are different). In addition to resizing, I changed the designs for the center circles so they were similar to the previous designs, but not identical. I use SketchUp to create the patterns. Each piece gets numbered so I can keep track of where it goes throughout the process.
 |
| Pattern for transom over main door |
Once the patterns is complete, I print a small copy to be used as a guide and another copy actual size. This ends up creating multiple pages that must be taped together to make a single pattern. Once printed and taped together, I use spray adhesive to attach the pattern to poster board. This makes the pieces substantial enough to be used as guides for cutting and grinding.
I then cut around the outside edge. I double check the size by measuring and by holding the pattern against the window it will cover and make sure it fits correctly. I make the pattern slightly smaller than the opening so there will be room to put a metal frame around the finished piece and so there is wiggle room to deal with any expansion/contraction of the wooden window frame.
My working surface is homasote (soundproofing fiberboard) attached to a piece of advantech OSB which sits on top of my work table that has been adjusted to a standing height (thanks to Ikea for the adjustable table legs!). Homasote makes a good working surface because it is just soft enough that you can use push pins while being firm enough to hold them and not fall apart like cork might. I cover it with newsprint paper to protect the surface from the flux and solder I will use later.
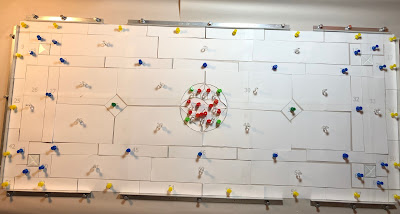
I place the pattern on the prepared work surface and frame it using angle aluminum pieces that are held to the board by aluminum push pins (Brett drilled small holes in the aluminum for the pins). This creates a frame that will constrain the size of the finished piece so it will end up the right size when completed.
 |
| Aluminum keeper frame in place |
Next step is to cut out each individual pattern piece. To do this I use specially made foil pattern scissors. They are designed to cut away enough paper to create room for the foil that will be put around each piece of glass before soldering.
Using the pattern guide I printed, I place the pieces back onto the framed work surface and pin each one in to the correct place.
Pattern cut and pinned into place
The next step is to start cutting the glass. I use a glue stick to attach the pattern piece to the glass and then trace around the outside with the glass cutter to score it. Then I need to break the glass and hope it breaks along the score line. I will grind each piece later, so I only need to get the cut close. Extra glass around the outside is fine, but if the glass breaks into the pattern, I start over and cut another piece. Luckily this pattern has a lot of straight lines as they are much easier to cut than curves are. I have a special set of pliers that are slightly curved at the end to help with breaking the glass. I use a plastic grid system as a cutting surface which lets the small glass chips fall into the little squares and prevents them from getting in the way.  |
| Pattern glued to glass |
 |
| Cut piece |
I lay the cut pieces back in the frame. They won't fit properly until they are all ground to exactly match the pattern.
 |
| Cut pieces awaiting grinding |
Once all the pieces are cut, I set up for grinding. My grinder sits at the end of my work surface. I use the same grid system under the grinder to catch glass dust, place a screen around the back and sides, as well as a piece of plexiglass to keep any glass from getting in to my eyes. There is water in the grinder. The process can be pretty messy.
 |
| Grinder and worktable |
Each piece gets ground down to the edge of the pattern. It is a relatively slow process and actually takes longer than the cutting does. Once all the pieces are ground, they get put back into the frame. There should be enough space around the pieces so that they can move a small amount. That space will be filled when the pieces are foiled.
 |
| All pieces ground to fit |
The paper patterns are then removed from the glass. To do this I use dish pans filled with very hot water. The pieces are soaked until the glue has softened enough so the paper comes free. I set the paper pattern on a paper towel, clean all the glue off the glass with a sponge, and then set the cleaned piece on top of the paper pattern. This allows me to keep track of which is which. I then dry the piece with a paper towel and place it back into the frame in its proper place. The pattern piece is then discarded. This is a fun part of the process as it is the first time I can really see the colors and pattern emerge.
 |
| Glass cut, patterns removed, but not yet foiled |
I then number each piece with a sharpie so I can keep track of where they belong as I remove them from the frame and begin to foil. The foil I am using has a black backing. This is because I will be using a black patina on the solder once the window is complete. You will be able see the back of the foil, especially around any clear glass pieces, and it looks much better if it all matches. The different glass varies in thickness so I use a variety of widths to try and keep the foil on the front and back as consistent as possible. The foil has an adhesive backing that allows it to stick to the glass. The foil is centered on the edge of the glass and then folded around on each side. The goal is to have the folded portion the same thickness on each side of the glass.
 |
| Aligning the foil |
 |
| Wrapping the foil around the edge |
After applying the foil, it is burnished with something smooth (like the barrel of a pen) to make sure it adheres well and there are no air bubbles or wrinkles. Most pieces are foiled all the way around, but the outer edges do not need foil as they will be covered by the zinc frame.
 |
| Burnishing the foil |
 |
Piece completely foiled
This is an edge piece so it only gets foiled on three sides. |
Once all the pieces are foiled, they are placed back into the frame. It is then ready to start soldering.
 |
| Foiling complete |
 |
| Center foiled |
Soldering is done by first applying flux to all the seams. I use a gel flux and apply a very small amount using an acid brush. Using 60/40 solder and a hot soldering iron I start by soldering anchor points to ensure pieces stay aligned properly. Solder lines should be rounded as flat lines are weaker. I work in one area and then move to another to prevent the glass from getting too hot which can cause it to crack. Once all the seams are soldered, I examine all the lines and fix any flat seams, bubbles or bumps. I then clean the entire surface with soapy water and rinse. This prevents from the flux from damaging stuff. The piece then needs to cool completely.
 |
| First side soldered |
Once the first side is clean and cooled off, it is then time to turn the piece over and solder the other side. This is a bit tricky as with only one side soldered, the seams are pretty weak. For a piece this size you really need a helper. I start by removing the aluminum frame from the top and sides. Then holding the piece against the board, stand the board up with the piece resting on the bottom edge. One person needs to pick the piece up from the top, keeping it vertical the entire time and having their hands spread equally to both sides. The other person then lowers the board horizontal and the glass is handed to them while standing face to face. The board is then raised to vertical and the glass is place on the bottom keeper edge again and the entire thing is lowered to horizontal once again.
The process of flux and soldering is repeated on the second side although there is no need for anchor points as the solder from the other side holds everything in place. Once the solder is complete, the piece cleaned and cooled, it needs to be turned over once again using the same process described above. Having both sides soldered makes it stronger, but if the piece is flexed it can break.
Once the first side is facing up again, it is time to add the frame. I use a zinc came which has a channel for the glass. I cut 45° corners just like you would when making a wooden picture frame. Once the zinc is cut, the frame is put around the glass and pinned to hold it in place. Add flux to the corners and to each seam that touches the frame. Solder is melted on the corners so it can seep down into the joint and a small bead of solder is run along each seam up to the frame. The piece is then cleaned and turned over so the frame can be soldered on the reverse side. Once the frame is in place it is much stronger and can be carefully turned over without needing help from any one else. It still needs to be carried vertically, as holding it horizontally could put enough stress on it to cause some of the glass to crack.
 |
| Zinc frame installed |
The piece is essentially done at this point if you want to leave the solder lines silver. In my case, I want them to be black, so I need to apply a patina. A patina essentially accelerates the process of oxidation that would happen naturally over time.
 |
| Patina partially applied |
 |
| Patina complete |
The only thing remaining is to install the stained glass into the transom. It is set in place and kept there by wooden strips screwed in to the window frame.
 |
| Brett installing wooden keeper strips |
 |
| It is done! |
Now I need to make the one for the other door and the dining room will be complete!


Excellent overview of your process - you should consider teaching others.
ReplyDeleteThanks Marcia. I have a few friends that have asked me to teach them. Hopefully one of them will come visit and we can give it a try. The credit for the process goes to Dave Roy of Stubborn Cow Glass. I worked with him when I did the first window for the dining area. He was a great teacher and I was good at taking notes.
DeleteThanks for the step by step Celina - what a painstaking process! Love love LOVE the finished product!
ReplyDelete