A couple of years ago we were camping during a cold and snowy weekend. Overnight lows were in the single digits ºF and we discovered that our refrigerator did not work when the weather was that cold. After a bit of research we found this was a common enough problem that Norcold makes a cold weather kit to correct it. I believe this kit is now standard, but that was not the case in our 2014 Arctic Fox 1150. Since we are mostly stuck at home because of the pandemic, we decided to take this opportunity to order and install the kit. The kit can be found at Amazon, the model number is 634913. This kit fits 6, 8, 10, 12, 17, and 18 cu ft gas absorption model refrigerators.
Then we removed the attachment screws. In ours case there are 5 of them, but it appears to be a bit random, so your mileage may vary.
Once all the attachment points were disconnected, we were able to move the refrigerator forward to give us room to work. There wasn't a good way to get leverage to move it, but we found that by having one person inside the camper pulling and one outside pushing, we were able to move it enough.
The installation instructions for this cold weather kit are really awful. We read them over several times before figuring out how to approach it. My recommendation is to ignore step 3 and the associated diagram as it confused more than it helped.
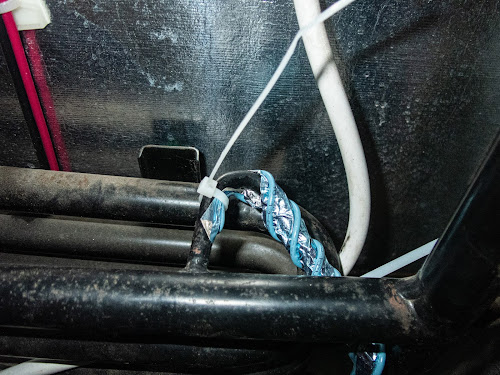
The kit contains a blue resistive wire that has adhesive on one side. It gets attached to the thin refrigerant tube. There is a section of the tube that runs in a curve horizontally at the top. The wire gets twisted around that section and then runs along side (but not twisted around) the vertical section below it. There are two notches along the wired tape. The instructions were not correct about which notch to use. It will likely vary by model, so I suggest laying out the wire to see how it will fit before removing the adhesive backing. We found it easier to remove the backing a bit at a time as we went along, rather than to remove it all at once as directed by the instructions.

Once the wire tape was in place, we added wire ties at the ends and at the curved points. We used a few more ties than were supplied with the kit.
The kit includes a temperature sensor which needed to be mounted. We used a sharpie to mark where the holes needed to be and used a 9/64 bit to drill them. We then used the spacers and screws provided with the kit to mount it.
The next step was to connect the heater tape to the 12 volt power supply and ground wires. The instructions said to cut the 12V supply wires, then solder the heater wire into it. The problem with that approach is that would hardwire the heater to the 12V power supply and we would not be able to remove the refrigerator without having to cut the wires. We decided to modify the heater wires by adding a quick connect so that we would be able to disconnect both the heater and refrigerator power should we ever need to remove the fridge in the future.
Once the wires were attached, we were ready to put everything back together. We pushed the refrigerator back into place. We decided to reattach all the interior screws first, but I suspect the order doesn't really matter. We then replaced the 5 outside screws, reconnected the gas line and tightened the screw on the stabilizing clamp, reconnected the 12V power and ground wires, and plugged in the AC power cord and reattached the clamp holding it in place. We then flipped the battery disconnect switch back, plugged in to shore power and turned the propane back on. We checked the propane connection behind the fridge for leaks. Everything was fine, so we ran a test to make sure the fridge still worked. It was fine on AC power. The first time we tried it on propane we got an error code, probably because we needed to purge the propane line. We lit one of the burners on the stove, let it run for a few seconds. When we tried the fridge again, everything worked correctly. Before closing up the access panel, we recaulked the attachment screws and the base of the gas line with Dicor sealant. Now we just need to wait until we are camping in cold weather before we will know whether all this effort was actually worth it.


All good info thanks for posting it, should be of help for many of us!
ReplyDelete